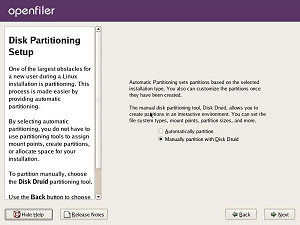
In my previous post, I talked about the hardware and backup solution for our NAS (Network Attached Storage). Now, let's go over the installation of Openfiler.
Openfiler is an open source storage appliance software package. It has a very nice web interface to manage disks, users, shares, etc. We downloaded Openfiler 2.3 Installation ISO image (x86/64), burned it on a CD and got to work.
 Note: The screenshots I took are from a nearly indentical installation I did with Virtual PC. Installing it like this also allows you to experiment with stuff without harming your real installation. For example: I disconnected one of the virtual harddisks (in a RAID-1 setup) to see if Openfiler would carry on as if nothing had happened.
We got 2x 1 TB SATA drives and we'll set them up as a RAID-1 array. This just means that we got 1 TB of disk space in total and if one hard disk fails, we can still access all our files. We'll create 3 partitions on each disk and leave the rest of the disk space to configure in Openfiler (although you can do this now as well). The swap partition is small and will most likely never be used, since we got 2 GB of RAM.
/boot = 102M (RAID)
/ = 4096M (RAID)
swap = 512M (non RAID)
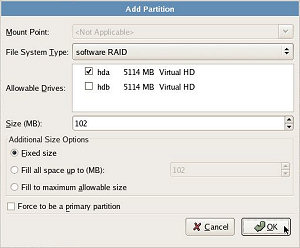 After the initial steps we get to the partition manager. In our case, the hard disks are called: hda and hdb. This can be different in your case. We'll create the /boot partition first:
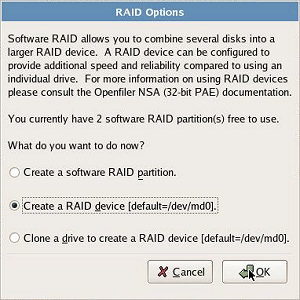 Now, repeat this (from step 2) for the other hard disk, hdb (selected in step 3). After that, make a RAID-1 partition from both individual partitions:
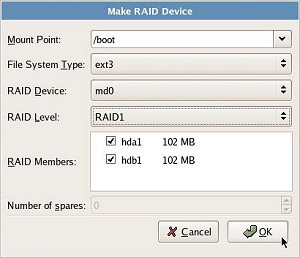 That's our first RAID-1 partition. Now, repeat all these steps for the / partition. As for the /swap partition, create them on both disks but don't create a RAID-1 partition for them (just choose File System Type: swap in step 3 and skip step 4, 5 and 6).
The rest of the hard disk space is left to be configured using the Openfiler web interface. Continue the installation process until it's done.
Once the server has booted, you'll see an IP address where you can reach the web interface. Remember it, or write it down somewhere. Before we go there, just login as root on the terminal.
In the unfortunate case that one of the hard disks fails, we should make them both bootable. This can be done with GRUB (GRand Unified Bootloader):
$ grub
device (hd0) /dev/hda
root (hd0,0)
setup (hd0)
device (hd1) /dev/hdb
root (hd1,0)
setup (hd1)
quit
After entering the root commands, some warnings appeared for me but it didn't seem that important. They are just warnings, not errors. The real work is done after the setup commands. Anyway, this should make both hard disks bootable.
Let's also grab the latest updates for Openfiler by using the rPath package update system. This can take some time:
$ conary updateall
In the next post, I'll discuss the configuration of Openfiler via the web interface. We'll create groups, users and ofcourse... shares!
Building a file server Using a jumpbox in ssh
Maykin Media focust op de technologie achter uw webapplicatie. Door te specialiseren op Python en Django bieden we efficiënte en professionele webdevelopment aan.
Copyright © 2026 Maykin Media. All rights reserved.